Mini S'Mores on a Stick

Mini s'mores on a stick. Super quick to make, can serve at a self serve snack bar and people can make them as they go. Click through to see how.

Remember all that left over chocolate from Easter that we froze? Well, I just found a new use for it; gotta use it all up right?

We have a newborn at home, and I really wanted to go camping this year, like, really really. But, um, I don't particularly think it's a good idea to sleep outdoors at 15 Celsius with a 1 month old. So, I had to find a way to bring camping to us!

Ding!

(That's the sound of the light bulb that went off in my head) Backyard camping!!! We can enjoy the same things, and go to sleep indoors when it gets too cold. I know what you're thinking: "But it's not really camping without s'mores!" My answer: "S'mores on a stick; problem solved." I'm so proud of myself right now.

Have you ever camped in your backyard? What kind of activities would you do to make it just like real camping?

By the way, this is my first official try at food styling (or creating a mess, whatever you want to call it), what do you think? Win or lose?


INGREDIENTS

Mini marshmallows
Chocolate
Graham cookie crumbs

Mini s'mores ingredients; chocolate, mini marshmallows, graham cookie crumbs.


STEPS

1. Melt the chocolate. If you use the microwave, make sure you do it in small intervals. Heat for a few seconds, take it out, stir, repeat until melted. If you try to melt it all in one go it might burn.

2. Put the mini marshmallows on toothpicks.

3. Dip the mini marshmallows in the melted chocolate then in the graham cookie crumbs.

4. Leave out to dry and enjoy!

Melted chocolate on a spoon for s'mores.
Mini marshmallows on toothpicks for mini s'mores.
Mini s'mores on a stick process.
Enjoy your mini s'mores on a stick! It's seriously like a tease.

These little s'mores are such a tease, seriously, they just leave you wanting more (I haven't decided if that's good or bad yet...). Oh, and I may or may not have eaten all of the leftover chocolate as a fondue.

Mini s'mores on a stick.

DIY: Wire Birthday Crown

wire crown.png

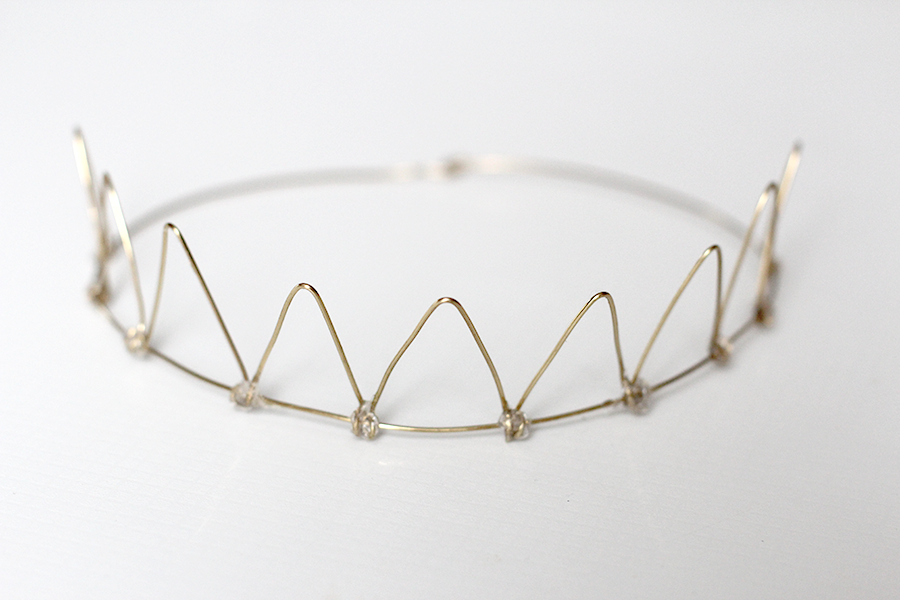
This tutorial is a bit overdue since it's the crown I made for my son's second birthday; which was over a month ago... but so much has happened since then that I'm sure you'll forgive me.

Like any mother out there my goal is to do everything I possibly can for my children; this of course includes birthdays. I'm not one for huge parties but I do love to decorate and plan celebrations. I don't usually do anything fancy, but I do tend to get creative, so I decided to start documenting some of these projects hoping to inspire others to use every excuse possible to have some fun with colors and textures!

Have you ever made a birthday crown? What kind of materials did you use?

On my son's first birthday I used felt to make his crown. It was really pretty but didn't hold too well. This time I decided to try something a little sturdier. I had wire lying around which I was planning to use to make a wire wrapped stone pendant (still haven't gotten around to it, ah!), so I decided to use some and try and make a wire crown.

This project was inspired by the wire art of Five From The Ground.

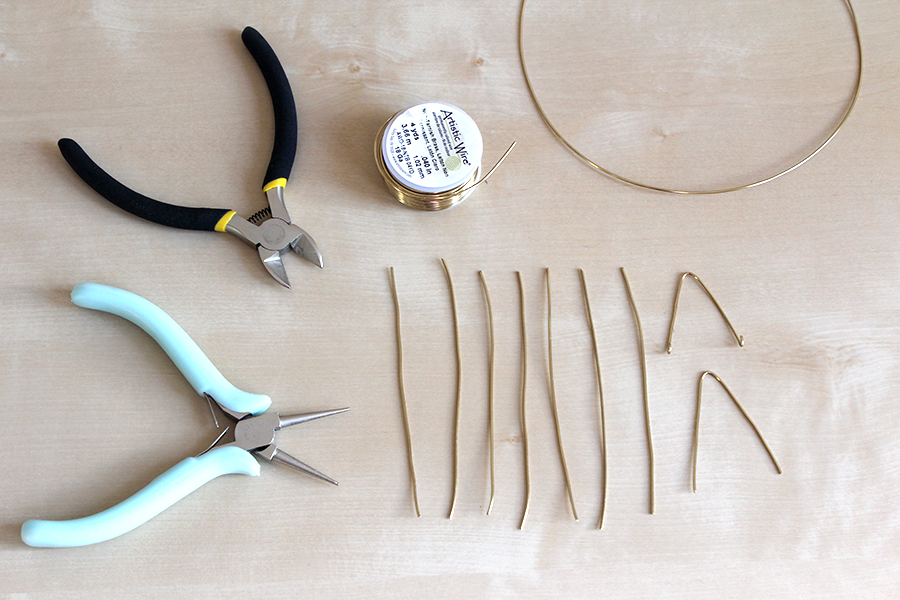
Materials

Wire
Round pliers
Cutters
Glue gun

materials for wire crown.png

Steps

1. Measure the head circumference of the person who will be wearing the crown and cut a piece of wire that's a bit longer. Form a circle as shown in the picture below then wrap the ends with the round pliers to attach it.

2. Cut 9 small strands of wire (approximately 3 inches long); you can cut more if you want more points to your crown. Bend them into triangles using your round pliers. Bend both ends of each triangle to attach to the crown.

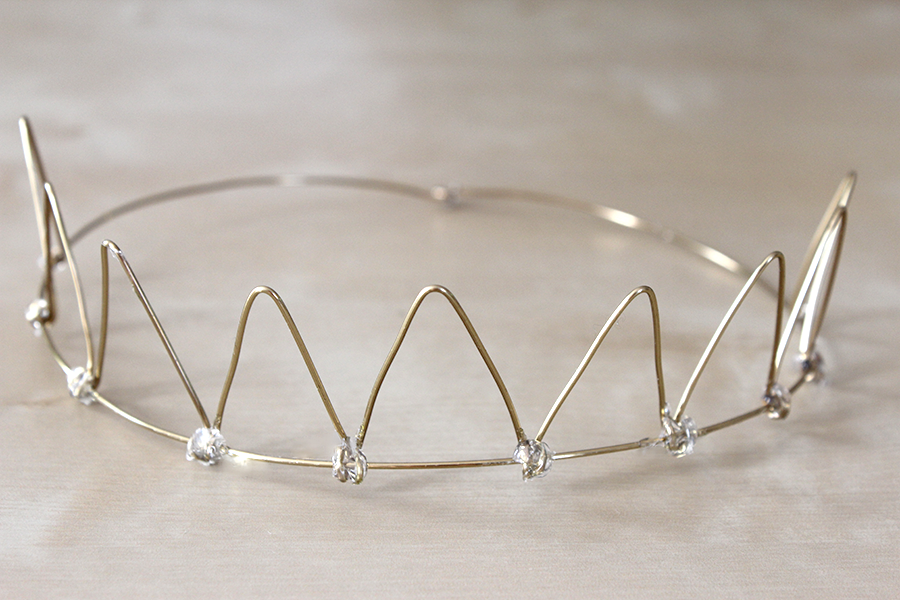
3. Secure the wire triangles onto the circle you created earlier by pressing on the curled ends then further secure using glue.

making a birthday crown with gold wire.png
pieces of wire crown diy.png

Place on the head of the king or queen. :)

This is by far the favorite crown I've made so far. It's totally cute and my son loved it. It did look a bit uncomfortable since the building medium is hard, but this can easily be fixed by using a softer (thinner) wire. Enjoy!

wire birthday crown diy.png

DIY: Handmade Business Cards

xfallenmoon business card diy.png

I recently attended a blogging conference. Before I went, I searched how to prepare myself for meeting other bloggers and realized I had no business cards to hand out. Wait, that's not true, I had some very very sad business cards to hand out. As in, hand cut, one sided, white printer paper with Times New Roman 12pt font. Sad I tell you, very very sad.

Now that I think about it, it's probably a good idea to have business cards regardless of whether or not you will be attending conferences. It's always nice to have something to hand out with your information on it whenever people ask what your site is about. I can't tell you the amount of times people were like: "You're a blogger? What's that? You mean you write your life on the internet?" ... and then I sat there for 20 minutes explaining everything. So glad I have business cards now, I can just hand one out and invite people to check it out. :)

Do you have business cards? What do they look like? What is your opinion on handmade business cards?

I haven't finalized my branding, so I don't feel ready to invest in professionally printed business cards. Soooo, I figured, why not make my own? That way I can make as many as I need, I'll have some fun, plus, it'll be unique.

Materials

Cardstock (2 different colors)
Pencil & eraser
Permanent marker (I suggest black)
Scissors
Glue

business card diy materials.png

Steps

1. Cut 2 rectangles of different color (I suggest making one white) and glue them together. Cut out some shapes and make a simple logo. Glue it in the center of the colored side of the card.

2. Write your blog's information in pencil on the white side of the card. When you're satisfied with what you've written and how you've written it, trace it with the black permanent marker (or colored if that's what you're into) then erase the pencil marks.

3. Distribute!

black and star business card diy.png
diy business card information side.png

Here is some information I suggest you write on your card:

  • blog name (obviously)

  • slogan (or short description of what your blog is about)

  • blog url

  • blog email

  • your name (if you have space, I didn't)

  • social media accounts (Twitter, Facebook, Google+, Instagram... I'd go with one or two of the ones you use most)

diy business card display xfallenmoon julie claveau.png